Setting Up a Raspberry Pi (Reichelt Edition)
Finally I got my first own raspberry pi \o/ and now it’s time to set it up.
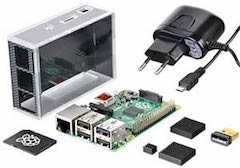
The one I have is from the famous german distributor called Reichelt, which by itself is not that relevant (besides of the nearly unbeatable price), but the
important thing about it is the equipment it is shipped with: an Edimax wireless USB adapter with Realtek RTL8188CUS controller, compatible to 8192cu.
Here’s my workflow for settings things up to get it up and running.
Install System
The image I used is wheezy-raspbian from the Raspberry Pi Download area, released on 2014-12-24.
I use ApplePi-Baker to write it to the 8 GB SD card, but you could also run something like
$ dd bs=4m if=2014-12-24-wheezy-raspbian.img of=/dev/rdisk2
$
Remarks:
- be careful to use the correct disk, indicated by the last number
- using rdisk instead of disk is up to 3 times faster
- Since
ddis not very garrulous, check the status with
$ watch -n 10 sudo killall -INFO dd
$
After that, plug it into the raspberry and boot. You have basically two options to control it:
- directly via keyboard and monitor
- via SSH
Direct Control
That’s the simplest thing: plugin in a USB keyboard and a HDMI monitor and you’re ready to go.
Usually on the first boot the configuration tool is already opened.
Anytime else login with user pi and password rasbperry.
SSH
That’s a bit more tricky, but due to the lack of hardware you might need it. So here’s the Mac version; I guess it works somehow similar on other systems.
- Connect the raspberry via ethernet cable to the Mac. It doesn’t matter if it’s crossed or not, either one works since the MacBook is smart enough
Additionally to allow internet sharing:
- Open System Preferences > Sharing (Freigaben) and check Internet-Sharing (Internetfreigabe)
- On the right side select WLAN (or AirPort) and check Thunderbolt Ethernet (or whatever your cable is connected to)
Now ssh into the pi (non OS X users will have to find out the correct IP address)
$ ssh pi@192.168.2.2
$
and use the password raspberry.
Basic configuration
Having logged in, let’s first set up some basics. If not already opened, open the configuration tool with
$ sudo raspi-config
$
You might want to change some settings, e. g.
4 Internationalisation Options
    I2 Change Timezone
        Europe/Berlin
    I3 Change Keyboard Layout
        Apple Aluminium ISO
        English (US)
        English (US) (Macintosh)
8 Advanced Options
    A2 Hostname
        (set to something useful)
Select finish and reboot (at least I like to do it now)
$ sudo reboot
$
Network Setup
To be able to connect to the internet directly using WLAN we have to set this up now. You should have you SSID you want to connect to and the WPA2 password available
$ sudo su
$ echo "options 8192cu rtw_power_mgnt=0 rtw_enusbss=0" > /etc/modprobe.d/8192cu.conf
$ wpa_passphrase <SSID> >> /etc/wpa_supplicant/wpa_supplicant.conf
<passphrase>
$
The echo command is very important since it will switch off power management of the WLAN adapter. If you miss this step you will most likely not be able to ping or ssh into the raspberry and existing connections will be lost very shortly.
Remark: adding wireless-power off to /etc/network/interfaces didn’t change anything so this trick didn’t work. I do not have this line added to the config. Basically I didn’t change anything inside this file!
Now either wait a bit - it takes some seconds p to a minute or force connection with
$ ifdown wlan0
$ ifup wlan0
$ tail -f /var/log/syslog
$
Cancel it when a connection has been established. It should after a while. If not try rebooting.
System Update
Having a working internet connection we can now update the system. Make sure you’re still root (see sudo su above).
$ raspi-config
------------------
8 Advanced Options
    A9 Update
Finish
------------------
$ apt-get update
$ apt-get upgrade
$ reboot
$
System Tweaks
Now you have the chance to install some tools (sudo su again!).
One good choice is screen but I prefer tmux.
$ apt-get install tmux
$
For powerline:
$ python-pip python-dev libtool automake
$ pip install psutil pyuv powerline-status
$
Other helpful system tools:
$ apt-get install htop
$
Now it’s time to install / clone / copy your preferred dotfiles to the pi and have fun.
Es gibt noch keine Kommentare